Showing posts with label Cornrows. Show all posts

Friday, July 5, 2013

Snapaholics Review and a Few Hairstyles for Girls

                                                Welcome aboard our newest sponsor!!!

                                                                  **Snapaholics**

We are blessed to have received the opportunity to partner with Snapaholics and we have also been asked to create a style and review some hair accessories from Snapaholics website. So of course we did just that! But i created more than one hair style incorporating all of the items we chose.

The items i chose are as follows...


*1 Pack of 1000 Black Rubber Bands
*1 8 Inch Hair Beader
*1 Pack of Square White Pony Beads
*1 Pack of Square Multi Color Pony Beads
*1 Pack of Square Multi Color Transparent Pony Beads
*1 Pack of Earth Tones Colored Metal Free Hair Bands
*2 Packs Of Large Bobbles in White and Black

Here is a bit about Snapaholics copied from their website...


"If you are not already addicted to hair bling for your little one, you soon will be! We provide all the hair decorations you could possibly need for rockin' cornrows, twists, braids, extensions, or any other style you could possibly dream up.

Our contact information (please email with ANY questions about the products, or just to say hi!)

By email: info@snapaholics.com
Kathleen Johnson
info@snapaholics.com"

On to our Review

Product Description
Snapaholics is a hair accessory company that sells a variety of different hair related items, mainly for children.

Pros:
*Speedy shipping
*Very friendly and professional customer service
*The accessories we received were all of good quality
*Snapaholics has a nice variety of accessories that arent found commonly

Cons:
*When i received the package the box of rubberbands was opened all over the box (probably caused in shipping)
*Id like to see a frequently updated website with more to offer and maybe boy items or hair products too

My Feelings:
I am overall very happy with everything i received.  I love when i can come across unique hair accessories and I'm also a big fan of bobbles, always have been.  I had a great customer service experience with Kathleen and i could definitely recommend Snapaholics. My favorite item were the square beads and the Diva liked these especially. The only thing i would suggest is that the size of the items in diameters and such were listed along with the item so that one wouldn't have to ask per item, this question. Shipping was very fast and i look forward to doing business with Snapaholics again! I'm excited for the new products that will be coming in soon at Snapaholics too.

Here are some hairstyles I've created using the items i chose from Snapaholics.com...


We want to thank Kathleen from Snapaholics for blessing us with this amazing package of goodies and for coming on board as our newest sponsor!  We are excited for this opportunity and  look forward to more  styling with Snapaholics in the near future.

God Bless And Happy Styling...

Diva R's Mommy-Kim

Thursday, April 25, 2013

Cute School Hair Style for Girls- Faux Hawk and Natural Curls

This is a style that we did for the Divas first day of school this year. It is a combination style including a Half- Faux Hawk with Cornrows, Natural Curls and Faux Cornrows.  This type of style is a versatile style that can be transformed over a week or so time frame. I'm playing catch up on my posts that I've had piling up so i do not have the products i used jotted down for this style. So if nothing else here is my hair-spiration which took about an hour to do (parting occupied most of the time).

Alot of people have a hard time comprehending how to part for a faux hawk but in reality there isnt a set way to do these and thats the fun aspect of it because you can be creative and make your parts any way youd like. I usually split the hair in two parts straight down the middle of her head and i clip the one side off then i work on the other braiding or twisting toward the mid line.  The advice i can give is to "pre-plan" as with any style and if you have to draw it out even on paper before you start parting it can help you get the mental picture better.  Sometimes as i braid i find myself creating a new part or adjusting my parting as i go deviating from my original plan.  I usually go with the flow when creating styles.


Since i started using completely natural and organic products back in 2010 the Divas hair has grown incredibly.  When we started off she had a puff fro as i call it which is a tuft of curls that went in every direction and were roundly placed around her head.
The Diva was 5 in the above picture.

God Bless and Happy Styling
Diva R's Mommy- Kim

Wednesday, February 27, 2013

4th of July Hairstyles for girls

 This is a Hair-spiration post. I meant to post this last year but i had just made it to posting these styles on our FB page and so without further a due here are three 4th of July hairstyles for girls that are super cute, festive and great for all ages that i did this past year on the Diva.  I didn't feel directions were needed as the styles are pretty much self explanatory and like most of the time these i created off the top of my head (not saying that someone hasn't thought of them before me, i just didn't see them anywhere else)...  I used a variety of products to create these styles and we are still on our all natural kick so that realm of products are all that we use. Last year i had done a cute 4th of July hair style too and you can click here to reflect upon it....

Enjoy!

                            (This was the HUGE hit of the 4th of July styles this year <3 span="">


 These are some of the many wonderful bows we were blessed with by our lovely sponsor Cute N Curly Bowtique <3 span="">


Happy Styling! God Bless...

Diva R's Mommy-Kim

Saturday, June 30, 2012

Pony Tails, Cornrows and Rope Twists Oh MY!

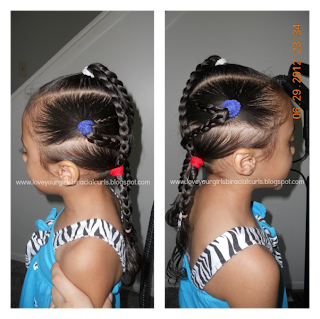
Here is a style that I created a short while ago as the thought crossed my mind that i need to do some more different types of styles where i incorporate varying facets of styling.  So this time around i decided to throw in some Pony Tails, Rope Twists, Cornrows and Clips into a random pattern. 


Im not exactly sure what i used in her hair with this style but its nothing out of our normal array of products :)  Rope twists are the only twists which withstand time in our household and i LOVE the POP effect that they give.  I just parted as i went and styled as i went... Nothing to it but to do it :)


Ive always been one for something different and im always looking for inspiration.  Styles like this only last a day or two in the Divas hair and ALWAYS need fixing up since her hair is so fine and silky like.


This style took about 55 minutes (mostly spent due to parting)...

Rope twists are created by taking the two strands of hair and twisting them INDIVIDUALLY in a CLOCKWISE direction THEN twisting them around each other in a COUNTER CLOCKWISE direction.

<3 Happy Styling <3

Diva R's Mommy-Kim

Saturday, June 9, 2012

Cornrows, Criss Crossed Ponies and Sidewinder's

So lately i have figured i may start posting some hair-spiration with not much wording included... So in the near future you may see some of that... But for now here is a brief posting on a style that i had recently done. This one i had freestyled from the basis of wanting to use some of our Sidewinders, and from there i just created.  It seriously has been too long since ive done cornrows and i find since I'm so slow handed at them, that they take longer than doing any other type of style... I really wish i could find a local person who could help me perfect my technique without having to pay for a class since i know everything there is to know besides a better hand technique (in my opinion).

This style began with pig tails and i moved back as i went... I parted the middle section first and clipped them off individually. Then i moved left to right in each box (cornrow, box braid, box braid, cornrow) Then i finished them off with 2 inch Sidewinders.  Then i moved on to the bottom row where i split the section straight down the middle and created some lower pig tails to coinside with the top frontal ones. I rubber banded those off with the top two middle box braids forming an X into them and braided the remaining free hair into two single braids and finally some Sidewinders.


I had decided to leave the frontal hair free from the pig tails for some variation.


I used Distilled water in our spritz bottle followed by Blended Beauty Soft Curls Moisturizer for a moderate moisturizer throughout as i planned on leaving this style in for a few days, and Kinky Curly Knot Today for hold as needed.

On the third day i touched her style up with a few alterations... I decided to braid the free hair into two big braids from each pig tail adding individual Sidewinders part way up the braids. I also parted off two front sections and cornrowed them, adding Sidewinders at each end. 


I pretty much left the rest as previously styled but i just re-did the (then fuzzy) cornrows and box braids


I try to use the same color scheme for a few days when using accessories so i dont have to manipulate much...


This style took about 40 minutes in total to do and lasted about 5 days with minimal touching up/frizz.


Happy Styling :)

Diva R's Mommy-Kim

Saturday, June 2, 2012

St. Patrick's Day Hairstyles 2012 LYGBC Style

Happy belated St. Patrick's Day &lt;3 We've been consumed in many things lately and Im now beginning to catch up on blogging.  My husband and I have recently welcomed our newborn son Baby G into our family in April and ever since just before that we've been on overload.  So without further adue i will begin posting again from more of an inspirational stance for a while.

For St. Patricks Day i did 3 consecutive styles which i created from my own thoughts and ideas. The first one is super obvious and easy i just posted it to show the super cute pot of gold hair ties i got from target for 1.00 each :) Its a simple pony tail style where i split the hair in two and pony tailed the top half and then the bottom half separately. I opted for single braids from each pony and finger twirled her ends. I used Kinky Curly Knot Today Leave In which we have been experimenting with for some time now and is one of the newer products that has been added to our collection (Review Coming... Stay Tuned)... I used the KCKT as a slicker/hold product.


This style took all of 15 minutes to create and is one that can be altered into several varying styles over multiple days.

The second style i created was a 3 leaf clover and natural curls doo where i added a little festive flair to the style by creating a 3 leaf clover via triple heart shape parting and a joining single braid forming the stem. Originally i had no idea what i was wanting to do and i couldnt find much inspiration that was unique so i just let my hands go and i ended up with this...


The first thing i did was i began styling with my Diva's hair being wet and detangled alongside application of some of our usual products. I had found a mid point at the top of her head where i began parting the first heart shape. Then i parted two like heart shapes on the sides of the center heart at an angle so that it would come together like a clover when finished. I then rubberbanded each heart off individually and then hit a road block... What will i do with the end pieces?
I decided to go with the first idea in mind (which better ideas came there after) and i just gathered the three groupings and braided them together in one big braid which did end up forming a stem and i pony tailed it off.
After i formed the 3 leaf clover i decided to let the remainder of her hair hang free and concluded it with some scrunches of Kinky Curly. Below is a close up of the clover...
All in all this style took about 40 minutes (mostly due to the parting)... BUT it lasted very nicely for several days with minor touch ups.

Here is the third style which i decided to keep the in place clover in BUT i added some variation... I cornrowed the two front parts of her hair and the remaining loose hair from the previous style back into a pony tail which i also gathered the three groupings from the clover into.
Then i braided a big braid including all of the hair pulled back and adorned it with a few clover rings that we got from St. Patty's Day cup cakes at Kroger and a FAB St. Patty's Leprachaun bow that we got from Cute N Curly Bowtique.

This style is super cute and my fav of the three that i did, it got many raves at school as this was her school party style :) It took about 30 minutes to change this style up from the previous style. 

Hope you enjoyed our St. Patrick's Day styles and may these be inspirational for years to come <3

God Bless.

Diva R's Mommy-Kim


Sunday, March 25, 2012

"Z" is for Zebra Hair-Style

Here is a style from a bit back that we did for a special Zebra week at Diva R's school... I didn't have many ideas how to incorporated festive Zebra-ness into her hair style so i said hmmm the phonics letter happens to be Z so why not try braiding a Z in her hair??

I googled myself crazy and i could not find any tutorials on the letter Z so i decided to just freestyle it and see how it turns out. I really wanted the Z to be evident so i figured that i would do it in the middle back of her head and do some pig tail to separate the hair evenly making the Z pop.
I first parted her hair into pig tails and clipped off the bottom half of her hair so i could part out the top part of the Z in its correct fashion. I used my rat tail comb to draw/part out the letter Z in her hair and though it looks complicated it was as simple as drawing a Z on the paper. Its like creating bubble letters to explain simplistically.

Then i clipped off both side sections so that i could cornrow the Z without interference. Then i rubber banded the very ending of the Z shaped cornrow so that the "tail" ending of the Z would blend in with her pig tails. Then i just braided each piggy tail into regular braids, rubber banded the mids and finger curled the ends.
Here is a front view... This is clearly another spin off of the foundated pig tail set with some intermediate flare.
This style took about 35 minutes to complete and lasted a few days with minor touch up to the pig tails.
God Bless
Diva R's Mommy-Kim


Monday, February 13, 2012

Announcing Our 9th Annual Hair Show... Featuring "The Princess"


Welcome to our 9th Annual Hair Show! We are proud to feature The Princess from Different Kinds of Curls.  Thank you Elizabeth for submitting your custom feature post it is a pleasure to have one of your sweet Diva daughters on our Hair Show <3

Here are some amazing hair styles that Elizabeth shared with us to share with you along side a bit about The Princess ...

This is my 7 year old daughter, who we refer to as "The Princess' on my blog. Her hair is wavy and thin, but it has lots of texture.  She loves having fun styles in her hair, mainly because while I am doing her hair, we get to spend that quality time talking and laughing together.


Thank you Kim, for the opportunity to be featured on your blog. 

Elizabeth & The Princess


It was a pleasure getting to know more about you and your daughter! Thank you for being a part of our Hair Show I'm loving the cute and unique cornrow styles that you create and i enjoy reading your blog as well!  I may have to borrow some of these styles one i get better at braiding in patterns <3

God Bless.

Who would like to be featured next on our Hair Show? If you are interested in being featured please email within to inquire @ loveyourgirlsbiracialcurls@yahoo.com and i can even send you a personalized interview!

Diva R's Mommy-Kim

Friday, February 10, 2012

Valentine's Heart Hairstyle For Girls Version 2

Heart Heaven is where we have been lately :) I've been surfing the net and concocting some ideas for some Valentines hair styles and i decided on doing heart themed styles for the rest of this month and then i will be on to some St. Patty's Day styles...


I had promised that i would post the re-vamped version of my most recent heart hairstyle and without further a due here it is!


So as you can see the style nearly stayed the same with a few tweaks and additions. I figured that i would add two additional pony tails instead of the one side pony tail now totalling 3 pony tails. I also re-did the 2 strand rope twists stemming from the heart and i added more rope twists to the other two pony tails totalling 6 rope twists.


We were itching to use some of our Sidewinders and we chose the brown and pink 3 inch Hair Holders to adorn the rope twists with.  I picked out a cute matching outfit and a misted a few spritz's of Shea Moisture Mist and we were revamped into a whole new style just that fast.


All in all this transformation style took 15 minutes and i plan on it lasting a few more days :)


The Diva really loved her festive style and the Sidewinders are one of her staple accessories as it is so she was really in Diva mode. I am beginning to fall in LOVE with these rope twists they have seriously been working for us and lasting as long as needed as well. They haven't lasted through the night though but lasting all day is a plus in our book for sure because twists have never been long lasting or even possible in her hair until now and still only rope twists are working.  


Here is an idea of what her rope twists look like after i unraveled them. Her hair seriously looks "loc'd" up. I like the cute fun spiral looking loc imitators :) Too bad i cant further unravel them without them losing their spiral look.


This is a simple to follow style and most of the styles i create are created in random freestyle way anyways, i usually create as i go with no format which would make tutorials hours long  and some what needless. * If you always start with your focal point of the style and work around it you will achieve the same style or create your own version like i did, having the heart as my focal point i just simply created around it.*


God Bless and Happy Pre-Valentine's Day <3


Diva R's Mommy-Kim