Showing posts with label Finger Curls. Show all posts

Wednesday, June 20, 2012

Diva R's Little Mermaid Inspired Birthday Hair Style & Birthday Balloon Bomb!

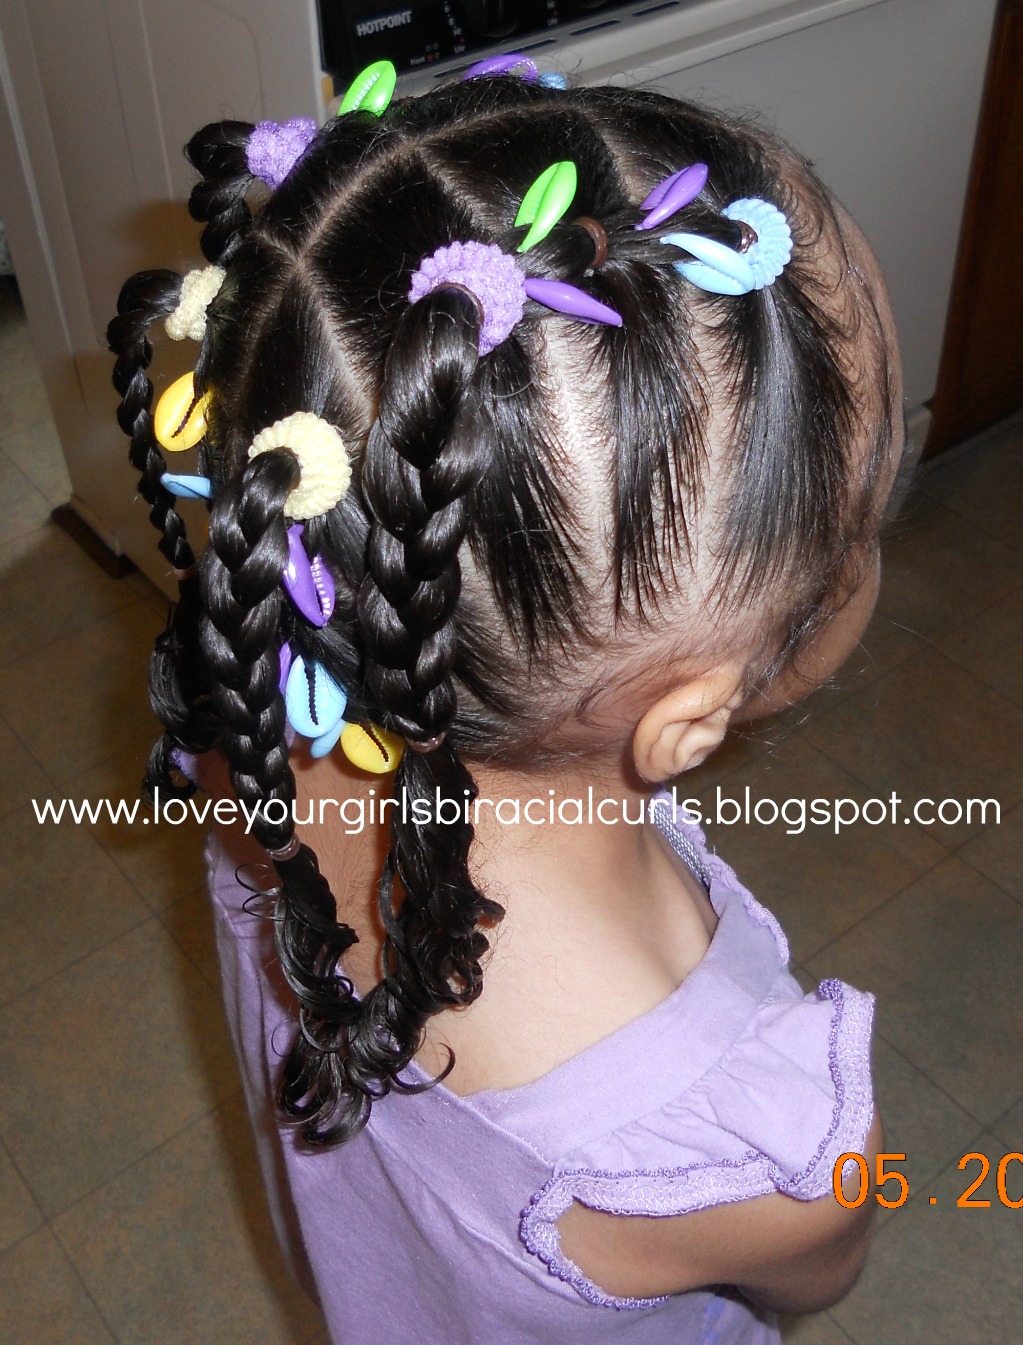
My Diva has turned 5 and its so hard to believe 5 years have passed already!!  Birthdays are usually a big deal in our family so we of course had to add special hair flair to the occasion.  The Diva chose Ariel The Little Memaid to be the theme for her party, so alongside her Ariel party dress i decided to do a style which paid tribute to her under the sea theme. What a better way to highlight this than with shells <3 These shells i had bought a while back from Curly Princess Hair Boutique (which is still one of the most fab online hair accessory boutique's in my opinion).

Here is the top view of the style i freestyled, i am not sure what i would call it but i incorporated piggy back pig tails which end in pony tails and big braids. Can't forget the beautiful shells and matching pony o's to add the appropriate splash of coordinating colors and the shells to bring out the under the sea element. 

In case anyone is wondering, the shells are actually beads and i slid them on just like i would beads from a beader.  I began this style by dampening her hair with our distilled water spritz and then i parted a straight part down the middle of her head from front to back. Then i started parting the boxed parts individually on each side from front to back, sectioning them off with clips as i went, trying to make sure they are as even as possible with the other side as i am super picky about parting.  I began adding some Blended Beauty Blended Cutie Soft Curls Moisturizer to each section from root to tip which is acting as my thicker moisturizer.

Then i began rubber banding each section off one by one beginning in the front, as i was rubber banding i was also applying some Darcys Botanicals Curl Jelly as my hold product, then i added pony tails and shells as i went.  While i was adding shells i piggy back tailed each section into the next until i got to my third boxed section where i pony tailed the previous sections into. Then i braided a big braid tieing the groupings together and finger curling her loose ends. I did this on both top front sections.


For the back i did the same but i went upwards with the piggy back tailing, rubber banding, pony-tailing, and shell adding.


I topped her style which took 45 minutes, off with some of a new product which we have yet to review (stay tuned), called Citrus Conditioning Leave-In Spritz by Honey Suckle Natural Haircare Line.  The Diva wore this style for a few days with much glory might i add. She was so thrilled at this accomplishment as it turned out being exactly what she wanted and the compliments just poured in.

So of course i had to balloon her room for her 5th Birthday morning and this year i was super pregnant and just 8 days away from giving birth so needless to say my lung power just wasnt there and the hubby worked long hours and wasnt able to help much. BUT i still got as many done as i could which was nearly two bags full and as the years go until she is too old to appreciate this i will keep doing this :)


The balloons stretched across her whole room and it was hard to get a good pic of them all  :)


She woke up in balloon paradise and knew exactly what the balloons were there for :)

My sweet Diva <3

Diva R's Mommy-Kim

Saturday, June 2, 2012

St. Patrick's Day Hairstyles 2012 LYGBC Style

Happy belated St. Patrick's Day &lt;3 We've been consumed in many things lately and Im now beginning to catch up on blogging.  My husband and I have recently welcomed our newborn son Baby G into our family in April and ever since just before that we've been on overload.  So without further adue i will begin posting again from more of an inspirational stance for a while.

For St. Patricks Day i did 3 consecutive styles which i created from my own thoughts and ideas. The first one is super obvious and easy i just posted it to show the super cute pot of gold hair ties i got from target for 1.00 each :) Its a simple pony tail style where i split the hair in two and pony tailed the top half and then the bottom half separately. I opted for single braids from each pony and finger twirled her ends. I used Kinky Curly Knot Today Leave In which we have been experimenting with for some time now and is one of the newer products that has been added to our collection (Review Coming... Stay Tuned)... I used the KCKT as a slicker/hold product.


This style took all of 15 minutes to create and is one that can be altered into several varying styles over multiple days.

The second style i created was a 3 leaf clover and natural curls doo where i added a little festive flair to the style by creating a 3 leaf clover via triple heart shape parting and a joining single braid forming the stem. Originally i had no idea what i was wanting to do and i couldnt find much inspiration that was unique so i just let my hands go and i ended up with this...


The first thing i did was i began styling with my Diva's hair being wet and detangled alongside application of some of our usual products. I had found a mid point at the top of her head where i began parting the first heart shape. Then i parted two like heart shapes on the sides of the center heart at an angle so that it would come together like a clover when finished. I then rubberbanded each heart off individually and then hit a road block... What will i do with the end pieces?
I decided to go with the first idea in mind (which better ideas came there after) and i just gathered the three groupings and braided them together in one big braid which did end up forming a stem and i pony tailed it off.
After i formed the 3 leaf clover i decided to let the remainder of her hair hang free and concluded it with some scrunches of Kinky Curly. Below is a close up of the clover...
All in all this style took about 40 minutes (mostly due to the parting)... BUT it lasted very nicely for several days with minor touch ups.

Here is the third style which i decided to keep the in place clover in BUT i added some variation... I cornrowed the two front parts of her hair and the remaining loose hair from the previous style back into a pony tail which i also gathered the three groupings from the clover into.
Then i braided a big braid including all of the hair pulled back and adorned it with a few clover rings that we got from St. Patty's Day cup cakes at Kroger and a FAB St. Patty's Leprachaun bow that we got from Cute N Curly Bowtique.

This style is super cute and my fav of the three that i did, it got many raves at school as this was her school party style :) It took about 30 minutes to change this style up from the previous style. 

Hope you enjoyed our St. Patrick's Day styles and may these be inspirational for years to come <3

God Bless.

Diva R's Mommy-Kim


Monday, April 23, 2012

Egg Tails Easter Hairstyle For Girls

This posting is coming a bit late i know but its better late than never :) ... We have been super busy and consumed with our soon to be welcoming of our Baby Boy G any day now as well as tons of other things! So since we didn't give the Egg Tails a whirl last year i decided to try them for the first time this year for Diva R's Easter Party at School. Before i started on the style i spent hours searching for some ideas and ways to keep the eggs from falling out of the tails and in the end i really liked how Princess Piggies created the Egg Tails with the webbed rubber banded effect veiling around each egg.

The element which i encountered that altered my initial idea of doing it that way was that my Divas hair is only about half as long in full curl mode so the webbing would take longer to do and i wanted to do 4 braids around it "entrapping" each egg so that they were wrapped like presents. But they kept sliding out so i opted for the basket look with the braided handle over top as this seemed to be the best way i could get them to stay put. I used the smallest plastic eggs that i could find in colors to match her shirt...


I began with pig tails and grabbed a random middle section of the pig tail and braided it to the end, i then had the whole back section of the pig tail to form the "basket" to hold the egg in place. I slid the first egg in and "molded" the loose hair around the egg the best i could with her hair being so thin and i rubber banded the hair together just below the egg and moved on to the second egg where i repeated the above steps. I ended her Egg Tails in finger curls. All in all this style was complete in 20 minutes.

I used Kinky Curly Knot Today Leave in Conditioner as the slicker on her freshly washed conditioned and partly air dried curls (which i will be discussing and reviewing soon)..

This turned out to be super cute and unique with a hint of fun and festiveness. Her friends at school (and parents) thought this was a cute and creative style and idea. She loves the compliments and her teachers always oogle her styles too :)  I kind of figured that the eggs wouldn't stay in her hair through school because her favorite daily activity is playing dress up at play time so i knew things would be going over her head.  This is exactly what happened but as always her amazing and thoughtful teachers put her pretties that may fall out in her cubby and it was to my surprise that even though the eggs fell out the form of the eggs were still in full effect and even as we were walking out with no eggs in people were stopping us with compliments so it turned out to be an additional blessing in disguise <3

Didn't think to take pictures though :/

Next year if we do this i will be opting for the webbed  encasing of the eggs and maybe Styrofoam or a hard egg shaped material like that since these smooth plastic ones wanted to just slide right out of my Divas hair.  I think that this may work alot better with getting less movement from the eggs on coarser type hair in this method i chose to do above but is still equally possible on any and all hair types <3. 

Here are some of the Diva's Blessed Easter Bows from Cute N Curly Bowtique!!!!!


Happy Easter <3 God Bless and remember who Easter is TRULY about!!! Not that Bunny either!


<3 Jesus <3


Diva R's Mommy-Kim

Sunday, March 25, 2012

"Z" is for Zebra Hair-Style

Here is a style from a bit back that we did for a special Zebra week at Diva R's school... I didn't have many ideas how to incorporated festive Zebra-ness into her hair style so i said hmmm the phonics letter happens to be Z so why not try braiding a Z in her hair??

I googled myself crazy and i could not find any tutorials on the letter Z so i decided to just freestyle it and see how it turns out. I really wanted the Z to be evident so i figured that i would do it in the middle back of her head and do some pig tail to separate the hair evenly making the Z pop.
I first parted her hair into pig tails and clipped off the bottom half of her hair so i could part out the top part of the Z in its correct fashion. I used my rat tail comb to draw/part out the letter Z in her hair and though it looks complicated it was as simple as drawing a Z on the paper. Its like creating bubble letters to explain simplistically.

Then i clipped off both side sections so that i could cornrow the Z without interference. Then i rubber banded the very ending of the Z shaped cornrow so that the "tail" ending of the Z would blend in with her pig tails. Then i just braided each piggy tail into regular braids, rubber banded the mids and finger curled the ends.
Here is a front view... This is clearly another spin off of the foundated pig tail set with some intermediate flare.
This style took about 35 minutes to complete and lasted a few days with minor touch up to the pig tails.
God Bless
Diva R's Mommy-Kim


Friday, December 30, 2011

Christmas Eve Hairstyle

Well Christmas came and went as we are so busy through the holidays my idea to style Diva R's hair was to style it in a fashion that i could change it up between a few days while still maintaining the same blue print style.

This style is very self explanatory so i will spare the detail :) I call this style a pony tail and cornrow style with finger curls.  This is my sweet Diva R on Christmas Eve :)


Here is a back/side view of the style. As you can see i parted 16 squares from the beginning of her hair line in the front until nearly the whole back of her head. Then i parted 4 cornrows at the very nape of her neck. I left this style neutral looking and didn't jazz it up with any accessories as my plan was to achieve an elegant yet natural look. 


I used our distilled water spritz, Bee Mine Curly Butter and Shea Moisture Spritz and used them respectively. These curls displayed are her NATURAL curls and as the day went they sprung up slightly more and more and i did not use anything but my finger to amplify her already in place ringlet curls. I found that some parts of her hair doesn't like to curl uniformly with the surrounding curls. I keep finding different texture curls and reverse patterns of curls all throughout her hair, this may be challenging at times to tame just right for some looks and within styles like this i find that sometimes making several or a few finger curls in one pony tail or grouping's this helps to keep the pattern flowing <3

I love styles like this because they are versatile, suitable for any occasion and can be a unisex hairstyle with minor tweaks as well as them being simple and quick.


I went with symmetrical parts this time and as i went i formulated the following days changes that i planned on doing so that it was more jazzed up for Christmas Day <3


Here is the back view of the style and you can see the cornrows underneath her curls...


 All in all this style took about 35 minutes.

The rubber bands i use and LOVE now are these pictured below... I bought them at the local beauty supply store and have noticed over time they changed brands so the last few times i bought some they were ok but snapped often as well it was hit or miss. These rubber bands are great and have withheld all tests and have not damaged her hair at all and in fact they are very giving on her hair and have yet to snap <3


Stay Tuned for the next two switch ups of this style...

God Bless and a Happy New Year to all!!!!

Diva R's Mommy-Kim

Tuesday, October 4, 2011

Back To School Hair Style Day 4

Time for yet another change, such as the leaves during fall change is good! So today's outfit choice was her frilly purple shirt and white leopard print pants. With this in mind i decided i wanted a cute yet busy combination style which still incorporated her nape of the neck cornrows which i had touched up at this point because they had gotten frizzy.


I applied some Bee Mine Luscious Balanced Cream Moisturizer to the last 4 inches of her cornrows before the beading. I then added some of our chubbie beads which are also known as the medium sized pony beads that have a sort of roundness to them, in black, white and, purple to the cornrows.


Then i split the top section into three parts, two being pig tails and one being a middle section behind the pig tails. I slathered some Bee Mine Curly Butter on each section as i went and pony tailed them each individually as i efficiently covered her hair root to tip. As for the pig tails i finger curled the remaining hair from each while twirling a little more curly butter in as i twirled for optimum place holding.


The middle section i split in two sections from the pony tail and braided two individual braids, rubber banded them and added black and purple clips.


This style took 35 minutes from beginning to end and styles like these tend to last longer in her hair even through school and sleeping. 

Diva R's Mommy-Kim

Sunday, October 2, 2011

Back To School Hair Style Day 3

Day 3 has brought us to a new style so i had taken her previous style down and shampooed and deep conditioned her hair. I used our Bee Mine Botanical Shampoo and i let it sit lathered in her hair for a few minutes then i rinsed it out and followed it up with our Bee Mine Deep Conditioner. This time around using the Bee Mine Deep Conditioner i decided to leave it in under her shower cap for about 10 minutes as she played in the bath and i rinsed it out thereafter. This is something new i added to our regime weeks prior, as i feel this is instrumental in protecting and providing more nourishment to her hair that has just been styled for a period of time and it has proven as such.

Then the following morning i took off her sleep cap and applied a generous amount of our distilled water  through her hair and began to finger detangle. To help aide the process i applied our Curly Butter following and her hair was perfectly detangled and frizz free. 

Up until this point i had no style idea in mind so i just began playing around with different ideas and something popped into my mind. I thought hmm i wonder if i could pull off some horizontal cornrows on the very nape of her neck/head. So i sectioned off about an inch worth (thickness wise) of hair going across the back of her head and dabbed some Darcys Botanicals Vanilla Madagascar Styling Cream mixed with some Original Moxie Just Gel on the section as i cornrowed. I moved up to the section above the first completed cornrow and parted another same size section and cornrowed the hair the opposite way also dabbing the above mentioned mixture as i went


Diva R wanted beads to match her outfit so we broke out our animal shaped beads that we got from Curly Princess Hair Boutique a while back and some of our locally bought small pony beads and went to town :) She LOVES these beads and them being animals really tops her charts.


So at this point her hair starts to go out on to the sides more toward her face making straighter type cornrows impossible so i decided to throw her hair up into a trusty side pony tail with the help of our DB Madagascar and OM Just Gel mixture used for the slicking.  We LOVE side pony tails and are quite partial to them, they are just right for little girls. I put a purple pony tail holder in place and braided one big regular three strand braid, rubber banded the end and finger curled the remaining hair.


Id say not too bad for a first time attempt :) I'm sure if i keep working at them they will be better and better over time as with anything else. BUT we were overly satisfied with the results and Diva R exclaimed her FAV part are the braids with animal beads <3  30 minutes into the style we were complete and ready for her 3rd day of school which she looks forward to everyday. I like the varying look to the cornrows, almost as if they are layered, this is a cool beginning style idea for a whole heads worth of opposite facing cornrows too.


 I noticed that this section of her hair is thicker than most other areas. Her head of hair is very scattered, she has varying curl patterns on top of varying thickness/thinness, and varying textures throughout as well.  I love super cute and girly combinations styles! As a side note, these two products that i mixed together seem to work the best in fighting those stubborn baby hairs of hers that Ive been fighting and dealing with for years. YAY for that!

This can make or break you especially if you are new into taking care of your little ones hair or even yours. A bit of advice is this, DO NOT try one thing and give up if it doesn't work! TRY THEM ALL and tweak the idea/technique and you are sure to be able to manage ANY head of hair.  If nothing else there are tons of bloggers you can email who will not charge you to help you out TRUST ME! I often hear people saying that they cant manage their child's hair, cant style their hair and don't know what to do and are considering relaxers or chopping or giving up as a whole after receiving obviously horrible one sided advice from a non-hair educated person(s) (usually family or friends) but not wanting to step out of their local beauty supply realm, drug store environment or realm of things having to be "inexpensive" to really see what they could have at their finger tips.

Understand quality isn't cheap and if it is you should question it!  It sure isn't quality, its quantity at that point masked with foreign wording which not everyone knows to dissect right away.  What better to use on natural hair than NATURAL products? This is coming from a natural and nature standpoint because Makes sense if you add 2 and 2. Why people attach a dollar sign to quality i will never understand. Things like that are worth saving for if nothing else.

If nothing else, as a second point, there are tons of ways you can sample products for free or get discounts on if you get into blog reading/participating, contacting companies and entering some of the many giveaways always going on through the oodles of present natural hair care bloggers/companies. Don't forget to check around for sales too! While your at it know that you could also win huge packages, gift sets or gift certificates and much more without have to come majorly out of pocket.

Nothing is impossible!

Diva R's Mommy-Kim

Saturday, October 1, 2011

Back To School Hair Style Day 1

School has begun so i will be showcasing Diva R's first 6 days of school styles one by one.  For her first day of school i wanted to do something girly, simple, cute and designed. I always let her pick out her school outfit and she takes great pride in this, my only requirement is that is has to be one of two that i show her and the whole outfit has to match :)  She chose one of her new Pink Akademik's outfits. So with this i just free styled a style the night before and here is how it turned out...


I shampooed and conditioned her hair with our trusty Bee Mine Botanical Shampoo and Bee Mine Deep Conditioner. Then i spritzed our lovely distilled water lightly over her hair squeezing it in by hand. I then put some Bee Mine Curly Butter on her mids through ends and finger combed it in. My first part was from just above the ear across her head ending right above her other ear creating a top and bottom half.  I began on the bottom half and as i went i dabbed a bit of Curly Butter on each section as i cornrowed and just let my hands create. I ended up with an x shape in the middle and a few regular cornrows.


Then i adorned the ends with each a three inch and two inch Sidewinders mixed together for a new and fun look! Ive yet to see this done anywhere yet ^_^ I LOVE the different look of the combined Sidewinders! I then split the top section of hair in two even parts straight down the middle and clipped the right section off so then i could part out a tapered section from the back of her head to the front and create a forward facing cornrow. I did this on each side and adorned those with coordinating Sidewinders <3

With the remaining hair on each side i created piggy tails and finger curled her loose hair into two separate sections on each side.


I put most of her baby hairs into the piggy tails and slicked them into them the best i could using some Curly Butter. I combed the little remaining hairs downward and they fell right into place. Finally i topped it off with our Juicy Spritz and off to school she went.


 I wonder if the Diva will ever grow out of her baby hairs? Hmm

This style took about an hour and 15 minutes tops.

Diva R is still in LOVE with PINK, so this will probably be a staple color in our regime for a while.

Diva R's Mommy-Kim

Wednesday, September 28, 2011

*Hair Style and Outfit from Little Bro Z's 2nd Birthday Party* Pig Tails with Double Knotted Braids

Little Bro Z had turned 2 and since we were all festively participating i had even less time for hair then planned. So i opted for a simple and quick style with a textured look and of course her spidey bows. 

I freshly washed her hair and conditioned it right before styling.
I began with our distilled water spritz and lightly covered her hair to the point where it was damp but not wet. Then i applied our Darcys Botanicals Shea Butter Curl Moisturizing Cream from nearly down to her roots throughout her ends. I then separated her hair in two sections straight down the middle and put each side into a pony tail so i had some piggy tails to work with.  

I then got this idea to knot her "tails" so i grabbed our Original Moxie Just Gel and slicked her tails with it and i began on the left side by splitting the tail in two sections and "tieing" a knot such as you would tie the first knot in a shoe. I followed this initial knot by tieing a second knot exactly like i did the first. Then i rubber banded the two ends together and finger curled the end.

I moved over to the right side and repeated all of the above steps.

Here are the results.


 I topped it off with our Bee Mine Juicy Spritz, added her festive pig tail spidey bows and 20 minutes later we were done and ready to party!

Diva R's Mommy- Kim

Tuesday, September 27, 2011

Half Cornrows and Pig Tails with Sidewinders

I LOVE the fall season! I seem to be overly inspired and just on the go with not a fret in place.  Needless to say the fall season seems to be the most busy and active for us! We are lovers of the weather being in the 70's. I am big on keeping Diva R's hair nice and styled or neatly kept while we are out especially as i have found this makes a huge impact on her and others. I think we are in a huge natural hair care awareness revolution! It seems lately we have been the center of attention, questions, oogling, inquiries and more with the styles I've been doing on her or her curl health in general :)

This tells me the word is getting spread! Which motivates me beyond expression. Its great that people are in search of and finding successfully information on how to properly care for their hair! 

So inspired by all of this i decided to alter a few previous styles I've done and create this one using some new Sidewinder's we received.  


I LOVE combination styles and ones that have such a cute look and more than one thing going on. I decided to do a half cornrow and half pig tail style. These styles prove to be quicker and easier than most for us.  I simply parted an even part from above her left ear to above her right ear going across which ended up being perfectly divided having a top section and a bottom section. 

I applied our distilled water spritz evenly through her hair so that it was drizzled with natures purest moisture. Then i smoothed some Bee Mine Bee Hold Curly Butter on the bottom section from root to tips. I began with cornrowing the bottom section going downwards. I used my trusty rat tail comb and parted rows as i went and ended them in our cherished 2 inch Sidewinder's in white, clear, grape and princess pink.


I chose matching color small pony beads to secure the Sidewinders in place and then wrapped a rubber band upwards a few times on each. I LOVE how the Sidewinders sit so lightly and with such cute and uniquely looking design they surely grab attention every tie she wears them. 

Then i split the top section of her hair right down the middle creating two sections for me to pig tail with our color coordinating pony tails. I made sure i generously applied the Curly Butter through each section and used our Tangle Teezer to help mold her hair gently into place.  When her hair was pig tailed i finger curled the remaining hair on each side and the Curly Butter i put on already really helps to make the curls hold and pop into their bouncy place.


 Then 3 spray's later of our Bee Mine Juicy Spritz  we were finished.  This style took about 45 minutes from beginning to end. This is the type of style that you can switch up amongst a hand full of consecutive days creating a new style easily each day.  We have grown to be addicted to these amazing Sidewinders and there isn't a look that cannot incorporate these lovely accessories!

Diva R's Mommy-Kim

Sunday, June 26, 2011

Father's Day Style Recap :)


So i decided to whip out the slide braids again :) and for Father's Day which was also on a Sunday this year i decided to do something ultra girly cute and to coordinate it with... Diva R loves wearing dresses she is the girly girl so she gets to wear them alot! This style was inspired by her canary yellow halter top dress.

It was quick simple and took all of 20 minutes from beginning to end. I used the Bee Mine Juicy Spritz along side the Lavish Curls Moisturizer topped off with our cherished Bee Mine Curly Butter.

The slide braids have become a cute addition to our styling regime, they are adorable and people always try and figure them out after they oogle over them :) and they are so easy even a Daddy can do them!


 Diva R has some of the most healthy vibrant curls i have seen. I see alot of biracial children on a regular and almost ONE of their parents do anything to care for their children's hair and that explains the ratty-looking-ness of it :( Poor children, there is no excuse for laziness parents!

This Father's Day was a blessed one as usual, it was all about Daddy and we hung out all day long and spent time with the fam as well.

In case your wondering these lovely flowers came from Tiffany's blessed hands over at Diva Locks (Diva Do's & Everything in Between)

I LOVE easy styles! Keep in mind this blog is for everyone of every hair type, you don't have to be biracial or have biracial children because you will gain consistently from LYGBC i promise that!!!

God Bless.

Diva R + Little Bro Z's Mommy-Kim

Friday, May 13, 2011

Mixed Chicks Hair Silk Review


Mixed Chick's Hair Silk

Product Description

Have you ever watched someone enter a room, or walk down the street, and their hair seemed to have a silky sparkle? MIXED CHICKS Hair Silk makes you and your hair look more vibrant. How? It's our light reflecting formula that not only gives you added shine, but prevents fly-aways and splits. -adds a polished texture -for curly & straight looks -helps color-treated hair appear more vibrant 

Ingredient's
Cyclomethicone (And) Dimethiconol, Dimethicone, Phenyl Trimethicone, C12-15 Alkty Benzoate, Caprylic/Capric Triglyceride, Panthenol (Pro Vitamin B5), Ethyl Ester Of Hydrolyzed Silk, Phenoxyethanol, Fragrance (Parfum)

Directions Place a few drops of MIXED CHICKS hair silk in your palms and apply. Can be used on wet hair/dry hair, or for controlling mid-day fly-aways.
Benefits
Adds a polished texture 
Helps color-treated hair appear more vibrant 
For curly & straight looks
 
Our Review

Scent: Reminds me of a springy summer blend, light floral mixed with light citrus maybe :)
Color: Clear
Consistency: Silky, Thin, Light and Slippery (which is a wonderful mix to us)
Cost: $11.99 per 1.7oz

 We have had this product for a month now and have used it multiple times on bother her dry and wet hair. We used this as a finisher product after our moisturizer was applied. The MC Hair Silk's claim for thermal protection also called for us to use it before she went out on the hot scorching days to play outside for hours :) It is supposed to help protect the ends of the hair from becoming dry lifeless and brittle from the harsh sun...

The picture on the left in the collage was Diva R' s hair before i put the MC Leave In and hair Silk into her hair.  At this point her hair was just shampooed and fresh out of the bath so it was still mostly wet. The picture on the right of the collage is of her hair with the MC Leave In and the Hair Silk finger combed through. I first applied the Leave In by itself via finger combing. Then i applied the Hair Silk, i began with two squirts and it covered half of her mids-ends leaving the other half of her hair requiring 2 squirts also :) Total 4 squirts of product used and that's not alot needed to cover Diva R's head! That's a plus, a little goes a long way with Diva R's hair.
(Side Shot)

You can visually see the difference! On the left her curls weren't even finger detangled yet, her curls just came to life! The definition is screaming at me! This collage pictures above were done on her wet hair for the first experiment with the Hair Silk and i can say that this was a great shine product for her wet hair and when it dried from being wet with the Hair Silk on it was super soft!

Below, the top picture is of our second trial of the MC Hair Silk, her hair was slightly damp but not wet and this was just the Hair Silk being applied to her damp hair :) LOOK at the curlees! I can say that so far this is a great product that holds true to its claim of a shiny silk after feel, controlling fly aways and being a fine finisher.
The above picture is another result picture from using the Hair Silk <3 It speaks for itself and was done on her completely dry hair. Note that i only applied it on her mids through ends. You can see the difference between the two areas that i did and didn't apply it to. I was sold when this had worked equally on her dry and wet hair and through all of our experiments on her non styled hair it performed very well and i love the light texture and scent of it as well. There is no after slime or film what so ever form this, after i apply it in her hair i cant even feel that it was on my hands :)

So of course i had to do a trial of the Mixed Chicks Hair Silk on her styled hair :)


I chose to do finger ringlet curls and incorporate the Hair Silk on my fingers twirling it in her ringlets as i go. I didn't use any holding products or anything other than the Hair Silk on the ringlets, i put this on first. Look at the shine!!!

So here is a natural style of Diva R's with the Hair Silk in action on a super hot sunny day :) My camera isn't the best but you can see NO FLY aways, its shining with luster and her curls are in full spring :) This was our Thermal Protection style, and it lasted in her hair all day. At the end of the day her hair was still super soft and it stayed detangled even!!

I was impressed.


We had used the Hair Silk in many fashions, with many styles, on many sunny days and with and without our regular products. I am happy to say that this fits our bill and turned out to be worth every penny ... I didn't even intend on trying this one in particular right away because i had my eye on the deep conditioner, but since that one wasn't available i opted for the Hair Silk and I'm SO GLAD that i did! Yay for Mixed Chicks, all we need now is to find a cute Mixed Chicks T Shirt for Diva and she will be set :) She knows the Mixed Chicks billboards when we pass them even.

I do know that there are some less desirable ingredients in the Hair Silk, which would be the cones... BUT because of all the good reviews i have read i decided to give it a whirl :)

and did i mention that the beauty supply that i bought it from over charged me! I will not ever buy Mixed Chicks from a local beauty supply because of that :) Its better to go straight to the source.

We are blessed to have been able to review the Mixed Chicks Hair Silk and consider it a pleasure using it as variously as we do :)

*Our review/opinion's expressed through LYGBC product reviews are completely of my experiences with using them)

God Bless.

Diva R's Mommy- Kim