Showing posts with label Pony Tails. Show all posts

Friday, July 5, 2013

Snapaholics Review and a Few Hairstyles for Girls

                                                Welcome aboard our newest sponsor!!!

                                                                  **Snapaholics**

We are blessed to have received the opportunity to partner with Snapaholics and we have also been asked to create a style and review some hair accessories from Snapaholics website. So of course we did just that! But i created more than one hair style incorporating all of the items we chose.

The items i chose are as follows...


*1 Pack of 1000 Black Rubber Bands
*1 8 Inch Hair Beader
*1 Pack of Square White Pony Beads
*1 Pack of Square Multi Color Pony Beads
*1 Pack of Square Multi Color Transparent Pony Beads
*1 Pack of Earth Tones Colored Metal Free Hair Bands
*2 Packs Of Large Bobbles in White and Black

Here is a bit about Snapaholics copied from their website...


"If you are not already addicted to hair bling for your little one, you soon will be! We provide all the hair decorations you could possibly need for rockin' cornrows, twists, braids, extensions, or any other style you could possibly dream up.

Our contact information (please email with ANY questions about the products, or just to say hi!)

By email: info@snapaholics.com
Kathleen Johnson
info@snapaholics.com"

On to our Review

Product Description
Snapaholics is a hair accessory company that sells a variety of different hair related items, mainly for children.

Pros:
*Speedy shipping
*Very friendly and professional customer service
*The accessories we received were all of good quality
*Snapaholics has a nice variety of accessories that arent found commonly

Cons:
*When i received the package the box of rubberbands was opened all over the box (probably caused in shipping)
*Id like to see a frequently updated website with more to offer and maybe boy items or hair products too

My Feelings:
I am overall very happy with everything i received.  I love when i can come across unique hair accessories and I'm also a big fan of bobbles, always have been.  I had a great customer service experience with Kathleen and i could definitely recommend Snapaholics. My favorite item were the square beads and the Diva liked these especially. The only thing i would suggest is that the size of the items in diameters and such were listed along with the item so that one wouldn't have to ask per item, this question. Shipping was very fast and i look forward to doing business with Snapaholics again! I'm excited for the new products that will be coming in soon at Snapaholics too.

Here are some hairstyles I've created using the items i chose from Snapaholics.com...


We want to thank Kathleen from Snapaholics for blessing us with this amazing package of goodies and for coming on board as our newest sponsor!  We are excited for this opportunity and  look forward to more  styling with Snapaholics in the near future.

God Bless And Happy Styling...

Diva R's Mommy-Kim

Wednesday, February 27, 2013

4th of July Hairstyles for girls

 This is a Hair-spiration post. I meant to post this last year but i had just made it to posting these styles on our FB page and so without further a due here are three 4th of July hairstyles for girls that are super cute, festive and great for all ages that i did this past year on the Diva.  I didn't feel directions were needed as the styles are pretty much self explanatory and like most of the time these i created off the top of my head (not saying that someone hasn't thought of them before me, i just didn't see them anywhere else)...  I used a variety of products to create these styles and we are still on our all natural kick so that realm of products are all that we use. Last year i had done a cute 4th of July hair style too and you can click here to reflect upon it....

Enjoy!

                            (This was the HUGE hit of the 4th of July styles this year <3 span="">


 These are some of the many wonderful bows we were blessed with by our lovely sponsor Cute N Curly Bowtique <3 span="">


Happy Styling! God Bless...

Diva R's Mommy-Kim


Saturday, June 30, 2012

Hair-Spiration: Sunburst Pony Tails With Two Strand Twists

This style is a throw back that i had posted on FB, Ive searched and searched for more pics of it and i cant seem to find any besides this one.  So i call this the Sunburst Pony Tails With Two Strand Twists which is simple and self explanatory.


Im always asked how i part these sunburst parts and honestly it was quite confusing at first for me even... So to simplify how i do it, i just part 4 even pig tails with a straight part down the middle from front to back and from ear to ear then i split them each into TWO sections creating 8 pony tails. So then the pony tails have created a "sun burst or sun ray" pattern raidating outwards from the back center of her head.

This was the time where i began twisting her hair so i didnt quite get the idea of twisting to get it to stay but the loose twists turned out cute anyways.  I just twisted with her curl pattern and the curls twisted loosely into themselves.

I cant believe how short her hair is here!!! Times sure passed too quick. This pic was taken a few months shy of 2 years ago :)

God Bless and Happy Styling!

Diva R's Mommy-Kim

Pony Tails, Cornrows and Rope Twists Oh MY!

Here is a style that I created a short while ago as the thought crossed my mind that i need to do some more different types of styles where i incorporate varying facets of styling.  So this time around i decided to throw in some Pony Tails, Rope Twists, Cornrows and Clips into a random pattern. 


Im not exactly sure what i used in her hair with this style but its nothing out of our normal array of products :)  Rope twists are the only twists which withstand time in our household and i LOVE the POP effect that they give.  I just parted as i went and styled as i went... Nothing to it but to do it :)


Ive always been one for something different and im always looking for inspiration.  Styles like this only last a day or two in the Divas hair and ALWAYS need fixing up since her hair is so fine and silky like.


This style took about 55 minutes (mostly spent due to parting)...

Rope twists are created by taking the two strands of hair and twisting them INDIVIDUALLY in a CLOCKWISE direction THEN twisting them around each other in a COUNTER CLOCKWISE direction.

<3 Happy Styling <3

Diva R's Mommy-Kim

Wednesday, June 20, 2012

Diva R's Little Mermaid Inspired Birthday Hair Style & Birthday Balloon Bomb!

My Diva has turned 5 and its so hard to believe 5 years have passed already!!  Birthdays are usually a big deal in our family so we of course had to add special hair flair to the occasion.  The Diva chose Ariel The Little Memaid to be the theme for her party, so alongside her Ariel party dress i decided to do a style which paid tribute to her under the sea theme. What a better way to highlight this than with shells &lt;3 These shells i had bought a while back from Curly Princess Hair Boutique (which is still one of the most fab online hair accessory boutique's in my opinion).

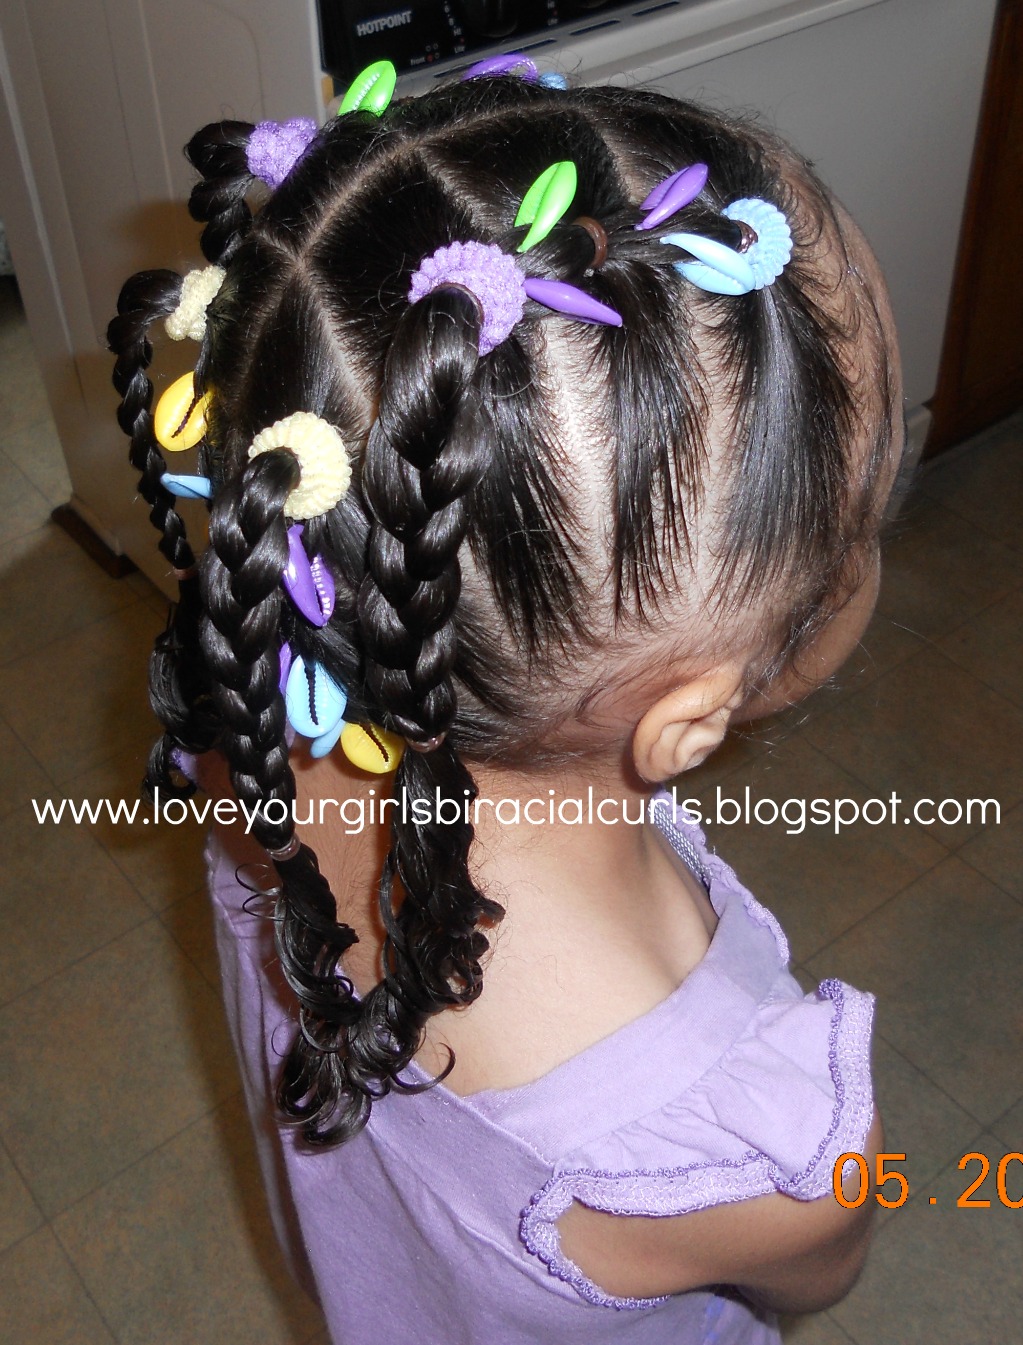
Here is the top view of the style i freestyled, i am not sure what i would call it but i incorporated piggy back pig tails which end in pony tails and big braids. Can't forget the beautiful shells and matching pony o's to add the appropriate splash of coordinating colors and the shells to bring out the under the sea element. 

In case anyone is wondering, the shells are actually beads and i slid them on just like i would beads from a beader.  I began this style by dampening her hair with our distilled water spritz and then i parted a straight part down the middle of her head from front to back. Then i started parting the boxed parts individually on each side from front to back, sectioning them off with clips as i went, trying to make sure they are as even as possible with the other side as i am super picky about parting.  I began adding some Blended Beauty Blended Cutie Soft Curls Moisturizer to each section from root to tip which is acting as my thicker moisturizer.

Then i began rubber banding each section off one by one beginning in the front, as i was rubber banding i was also applying some Darcys Botanicals Curl Jelly as my hold product, then i added pony tails and shells as i went.  While i was adding shells i piggy back tailed each section into the next until i got to my third boxed section where i pony tailed the previous sections into. Then i braided a big braid tieing the groupings together and finger curling her loose ends. I did this on both top front sections.


For the back i did the same but i went upwards with the piggy back tailing, rubber banding, pony-tailing, and shell adding.


I topped her style which took 45 minutes, off with some of a new product which we have yet to review (stay tuned), called Citrus Conditioning Leave-In Spritz by Honey Suckle Natural Haircare Line.  The Diva wore this style for a few days with much glory might i add. She was so thrilled at this accomplishment as it turned out being exactly what she wanted and the compliments just poured in.

So of course i had to balloon her room for her 5th Birthday morning and this year i was super pregnant and just 8 days away from giving birth so needless to say my lung power just wasnt there and the hubby worked long hours and wasnt able to help much. BUT i still got as many done as i could which was nearly two bags full and as the years go until she is too old to appreciate this i will keep doing this :)


The balloons stretched across her whole room and it was hard to get a good pic of them all  :)


She woke up in balloon paradise and knew exactly what the balloons were there for :)

My sweet Diva <3

Diva R's Mommy-Kim

Saturday, June 9, 2012

Cornrows, Criss Crossed Ponies and Sidewinder's

So lately i have figured i may start posting some hair-spiration with not much wording included... So in the near future you may see some of that... But for now here is a brief posting on a style that i had recently done. This one i had freestyled from the basis of wanting to use some of our Sidewinders, and from there i just created.  It seriously has been too long since ive done cornrows and i find since I'm so slow handed at them, that they take longer than doing any other type of style... I really wish i could find a local person who could help me perfect my technique without having to pay for a class since i know everything there is to know besides a better hand technique (in my opinion).

This style began with pig tails and i moved back as i went... I parted the middle section first and clipped them off individually. Then i moved left to right in each box (cornrow, box braid, box braid, cornrow) Then i finished them off with 2 inch Sidewinders.  Then i moved on to the bottom row where i split the section straight down the middle and created some lower pig tails to coinside with the top frontal ones. I rubber banded those off with the top two middle box braids forming an X into them and braided the remaining free hair into two single braids and finally some Sidewinders.


I had decided to leave the frontal hair free from the pig tails for some variation.


I used Distilled water in our spritz bottle followed by Blended Beauty Soft Curls Moisturizer for a moderate moisturizer throughout as i planned on leaving this style in for a few days, and Kinky Curly Knot Today for hold as needed.

On the third day i touched her style up with a few alterations... I decided to braid the free hair into two big braids from each pig tail adding individual Sidewinders part way up the braids. I also parted off two front sections and cornrowed them, adding Sidewinders at each end. 


I pretty much left the rest as previously styled but i just re-did the (then fuzzy) cornrows and box braids


I try to use the same color scheme for a few days when using accessories so i dont have to manipulate much...


This style took about 40 minutes in total to do and lasted about 5 days with minimal touching up/frizz.


Happy Styling :)

Diva R's Mommy-Kim

Saturday, June 2, 2012

St. Patrick's Day Hairstyles 2012 LYGBC Style

Happy belated St. Patrick's Day &lt;3 We've been consumed in many things lately and Im now beginning to catch up on blogging.  My husband and I have recently welcomed our newborn son Baby G into our family in April and ever since just before that we've been on overload.  So without further adue i will begin posting again from more of an inspirational stance for a while.

For St. Patricks Day i did 3 consecutive styles which i created from my own thoughts and ideas. The first one is super obvious and easy i just posted it to show the super cute pot of gold hair ties i got from target for 1.00 each :) Its a simple pony tail style where i split the hair in two and pony tailed the top half and then the bottom half separately. I opted for single braids from each pony and finger twirled her ends. I used Kinky Curly Knot Today Leave In which we have been experimenting with for some time now and is one of the newer products that has been added to our collection (Review Coming... Stay Tuned)... I used the KCKT as a slicker/hold product.


This style took all of 15 minutes to create and is one that can be altered into several varying styles over multiple days.

The second style i created was a 3 leaf clover and natural curls doo where i added a little festive flair to the style by creating a 3 leaf clover via triple heart shape parting and a joining single braid forming the stem. Originally i had no idea what i was wanting to do and i couldnt find much inspiration that was unique so i just let my hands go and i ended up with this...


The first thing i did was i began styling with my Diva's hair being wet and detangled alongside application of some of our usual products. I had found a mid point at the top of her head where i began parting the first heart shape. Then i parted two like heart shapes on the sides of the center heart at an angle so that it would come together like a clover when finished. I then rubberbanded each heart off individually and then hit a road block... What will i do with the end pieces?
I decided to go with the first idea in mind (which better ideas came there after) and i just gathered the three groupings and braided them together in one big braid which did end up forming a stem and i pony tailed it off.
After i formed the 3 leaf clover i decided to let the remainder of her hair hang free and concluded it with some scrunches of Kinky Curly. Below is a close up of the clover...
All in all this style took about 40 minutes (mostly due to the parting)... BUT it lasted very nicely for several days with minor touch ups.

Here is the third style which i decided to keep the in place clover in BUT i added some variation... I cornrowed the two front parts of her hair and the remaining loose hair from the previous style back into a pony tail which i also gathered the three groupings from the clover into.
Then i braided a big braid including all of the hair pulled back and adorned it with a few clover rings that we got from St. Patty's Day cup cakes at Kroger and a FAB St. Patty's Leprachaun bow that we got from Cute N Curly Bowtique.

This style is super cute and my fav of the three that i did, it got many raves at school as this was her school party style :) It took about 30 minutes to change this style up from the previous style. 

Hope you enjoyed our St. Patrick's Day styles and may these be inspirational for years to come <3

God Bless.

Diva R's Mommy-Kim


Tuesday, February 14, 2012

Valentine's Day Topsy Tail Created Heart and Natural Curls Combination Hairstyle

Happy Valentine's Day everyone!!!  Here is yet another Valentine's Day hairstyle for the fellow Divas out there &lt;3 I had already posted this one on our Face Book page and i had received the idea from one of the fellow amazing hair blogs i just forget which one(s) so if YOU have done this prior too i will gladly mention with credit <3


This style is "Topsy Tail" created and it begins with a half pony tail. After i pony tailed half of her hair i split the section into two even parts and i braided them individually creating two braids from the pony tail as shown below...


This is where the Topsy Tail tool comes into play... I do not know if there are modern versions of these as i have not seen any. This is one I've had since i was young that i had found un used in my misc boxes of things.  I figured i would get it out and start playing with it!


Then i put the two braids through the hole on the Topsy Tail and centered the pick end underneath her pony tail and pushed the braids up through the pony tail to where they were then in a "water-fall" fashion one on the left and one on the right.  I had two bobby pins handy and i molded each braid into a left and right forming a heart between the two and i used 1 bobby pin on each side to hold the heart in place. Then i rubber banded the two ends together as pictured below...


Here is a close up of the braided heart <3


I was going to leave her hair just like that with no addition but i decided that since i had so much hair in the top pony tail it thinned out her bottom section so i decided i would pony tail it with the top section remainder and adorn it with one of our new Valentine bows from Cute N Curly Bowtique <3


I used our distilled water spritz, Darcy's Botanical's Curl Styling Cream and Pure Jojoba Oil (which i will be reviewing shortly)...


The Jojoba Oil i used lastly as a sealer and moisture retainer and i used just over a nickel size amount along side a few spritzes of distilled water for dilution.

These are the bows we were blessed with for Valentines Day <3 <3 <3


This style was simple and quick and its super easy, no skill needed. This one is one of my favorite hairstyles that we did this year as of yet.

Diva R's Mommy-Kim